How to Install Google Analytics in WordPress
Do you want to connect Google Analytics to WordPress? Knowing how your audience interacts with your website is crucial for your success.
The best way to know your website traffic stats, and this is what Google Analytics provides for FREE.
Many WordPress users struggle when it comes to connecting Google Analytics to their WordPress site and they miss out on collecting data about their users.
Fortunately, there are several methods available for connecting Google Analytics to WordPress.
In this article, we will discuss what Google Analytics does and why it matters to your site. Then we’ll share four ways you can connect it with WordPress to start tracking activity.
Let’s get right to it!
Why is Google Analytics Important for Bloggers?
Once you start a blog, your #1 goal is to get more traffic and subscribers. Google Analytics help you make data-driven decisions by showing you the stats that matter. You can see:
Who visits your website?
This part of analytics answers what is the geographical location of your audience, which browser did the user use to visit your site and other important information such as screen resolution, JavaScript support, Flash support, language and more.
This data is extremely useful, and it can help in numerous ways. When getting a custom design, you can use the user data to make sure that your site will be compatible with your audience.
If most of your users don’t have Flash support, then you should avoid adding the flash element in your site. If most of your users are on 1280 screen resolutions, then make sure that your design is compatible with that resolution or smaller.
What do people do when they are on your website?
You can track where the users are going on your website, how long do they stay on your website, and what is the bounce rate (the percent of users exit your site on the first visit).
By using this information, you can decrease the bounce rate and increase your pageviews.
You can also find your most popular articles, articles that are not doing so well, and what kind of content your users are looking for.
When do people visit your website?
By looking at the hottest hours in the day for your site, you can pick the time when you publish your post. If that time zone is not compatible with yours, then you can schedule your post to meet that hour.
How do people find your website?
This section of the analytics shows you where did the users come from (for example: Search Engines, Direct Links, Referral links from another site).
It also shows you what percentage of your visitors came from each of these sources. Google analytics gives you the breakdown of each of these categories. If it is the search engine category, then it shows you which search engine got you the most traffic, Google, Yahoo, Bing etc.
The breakdown of referral sources shows you which sites you need to work with the most. If your top referral source is Facebook, then you need to have exclusive Facebook content to make your Facebook audience feel special.
If your top referral source is an external website, then you might want to consider having a partnership with that website (guest post exchange or something else).
How do people interact with your content?
Google analytics shows how your users interact with your site’s content. It shows you what percent of the user clicked on which link on your site and much more.
You can run A/B split tests by creating content experiments in Google Analytics to understand what works best to meet your goals.
By seeing the user interactivity, you can work your content around your users. By seeing the answers to the questions above, you can focus on the strategies that work for your site and avoid strategies that don’t work.
Simply put, eliminate the guesswork and focus on stats that matter, so you can make data driven-decisions.
How to Signup with Google Analytics
Google Analytics is available for free and all you need is a Google or Gmail account to sign up. The sign up process is quite simple, follow the step by step instructions below to create your Google Analytics account.
Step 1: First you need to visit Google Analytics sign up.
You will be asked to login with your Google account. If you already have a Google or Gmail account, then you can use that to sign-in. Otherwise, you can go ahead and create a Google account for yourself.
Step 2: Once you sign-in with your Gmail account, you will be prompted to a screen. This is where you will signup for Google analytics with your Gmail account.
After that, you will be asked to provide an account name. This name will be used internally so you can use anything like your business name.
Step 3: On the next screen, you will be given choice to choose between a web, apps, or apps and web. Make sure you select ‘Web’.
After that, you need to enter website name, website’s URL, country, and time zone.
Once you have entered this information, click on the Next button. You will be presented with Google Analytics terms and service which you must agree to, so click on ‘I Agree’ button.
Step 4: Now you will be presented with your Google Analytics tracking code. You can copy this tracking code because you will need to enter it in your WordPress site depending on the method you use below.
You cann also simply leave this browser tab open and switch back to copy the code when needed.
We suggest leaving the analytics browser tab open as you may need to revisit it, once you have installed the code on your WordPress site.
Now that you have setup a Google Analytics account, let’s take a look at how to install Google Analytics in WordPress.
How to Install Google Analytics in WordPress
There are a four different ways to setup Google Analytics in WordPress. We will show you four methods where the first option is the easiest and the last being the hardest.
You can choose the one that best suits your needs.
1. Use a Google Analytics WordPress Plugin
1. Google Analytics for WordPress by MonsterInsights
MonsterInsights is the most popular Google Analytics plugin for WordPress. Over 3 million websites use it including the likes of Bloomberg, PlayStation and more.
It is the easiest and by far the best way to add Google Analytics to WordPress (for all users beginners and experts alike).
MonsterInsights is available as both, a paid premium plugin, and a free version. In this tutorial, we will be using the MonsterInsights free version.
You can use the MonsterInsights Pro version if you want more advanced features like E-commerce tracking, Ads tracking, Author tracking, etc. The process of setting them up is the same.
Let’s get started.
The first thing you need to do is install and activate the MonsterInsights plugin.
Upon activation, the plugin will add a new menu item labeled ‘Insights’ to your WordPress admin menu. Clicking on it will bring the MonsterInsights setup wizard.
First, you will be asked to choose a category for your website (a business website, blog, or online store). Select one and then click on ‘Save and Continue’ button.
Next, you need to click on the ‘Connect MonsterInsights’ button.
This will bring up a popup that will take you Google accounts where you will be asked to sign in or select a Google account if you are already signed in.
Next, you will be asked to allow MonsterInsights to access your Google Analytics account.
Click on the ‘Allow’ button to continue.
The final step is to select the profile you want to track. You need to select your website here and then click on the ‘Complete Connection’ button to continue.
MonsterInsights will now install Google Analytics on your website. After that, you will be asked to select the recommended settings for your website.
The default settings would work for most websites. If you use an affiliate link plugin, then you need to add the path you use to cloak affiliate links. This will allow you to track your affiliate links in Google Analytics.
Click on the Save and Continue button to save your settings.
Next, MonsterInsights will show you paid add-ons that you can access if you upgrade to PRO. You can simply click on the ‘Save and Continue’ button to skip this step.
After that, you will be asked to install WPForms plugin, which is the best WordPress contact form plugin. You can install it or simply click on ‘Skip this Step’
That’s all you have successfully installed and setup Google Analytics on your WordPress site. Remember, it will take Google Analytics sometime before showing your stats.
The best part about MonsterInsights is that you can view your Google Analytics reports inside your WordPress dashboard. Simply visit Insights » Reports page to check out a quick overview of your analytics data.
It also comes with a Popular Posts addon that allows you to show your top performing content to boost your traffic & pageviews.
You can use it to automatically add inline popular posts links to boost engagement:
Of if you’re using an online store, then it can also automatically add your top performing products at the end of each blog post to boost sales:
The simplest way for most WordPress users to add Google Analytics to their sites is with a Google Analytics WordPress plugin. This method saves you from having to edit your website’s code.
To do this, we recommend two plugins:
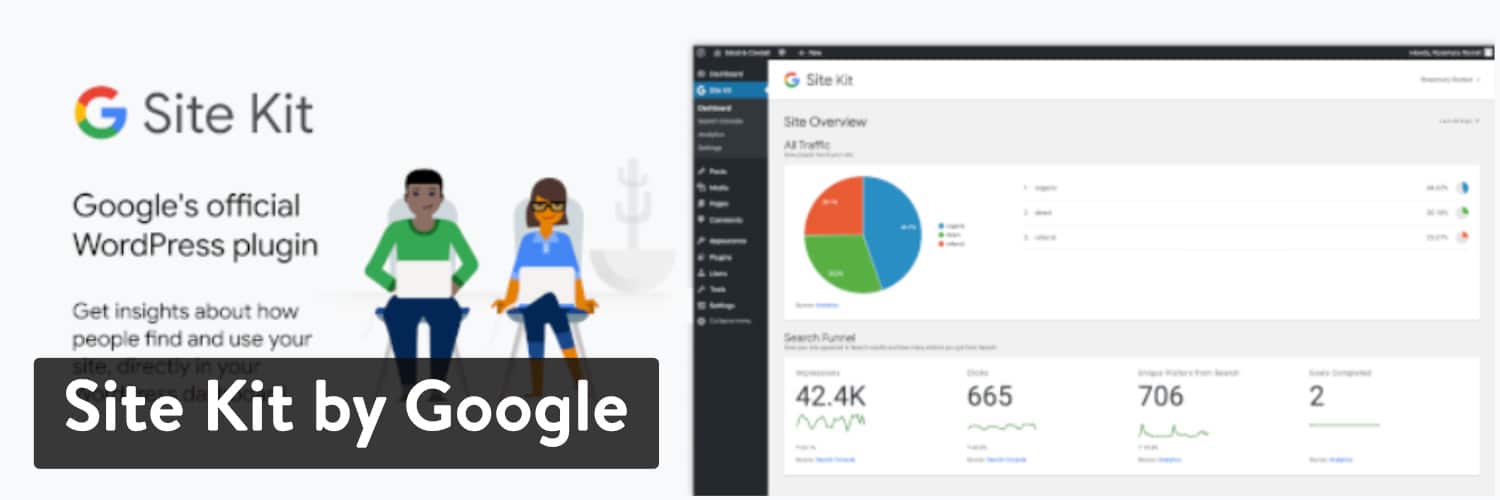
2. Site Kit by Google
If you’d like to add Google Analytics to your WordPress site, Google has got you covered with a simple yet powerful plugin: Site Kit by Google.
Site Kit by Google WordPress plugin
This free plugin connects Google Analytics to your WordPress site in just a few clicks but that’s not all. On top of analytics, this plugin pulls data from other services provided by Google, like Google Search Consolle, Google AdSense, and PageSpeed Insights allowing you to build a nice dashboard based on Google as your data source.
Here’s how to get started:
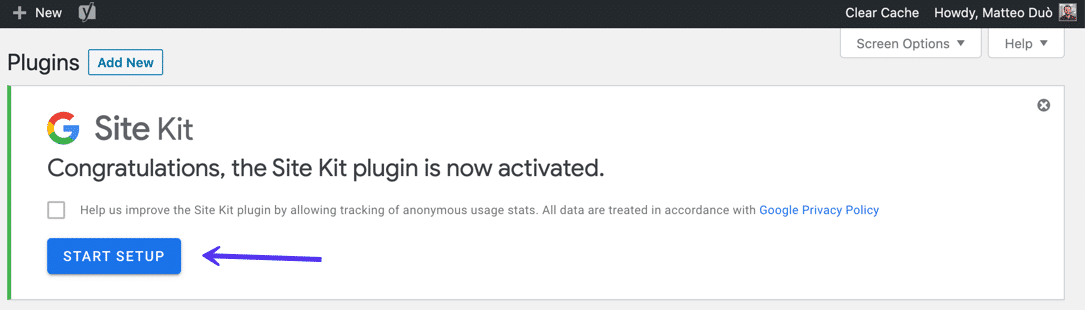
Install and activate the Site Kit by Google plugin, then click on the Start Setup button.
Setting up Google Site Kit WordPress plugin
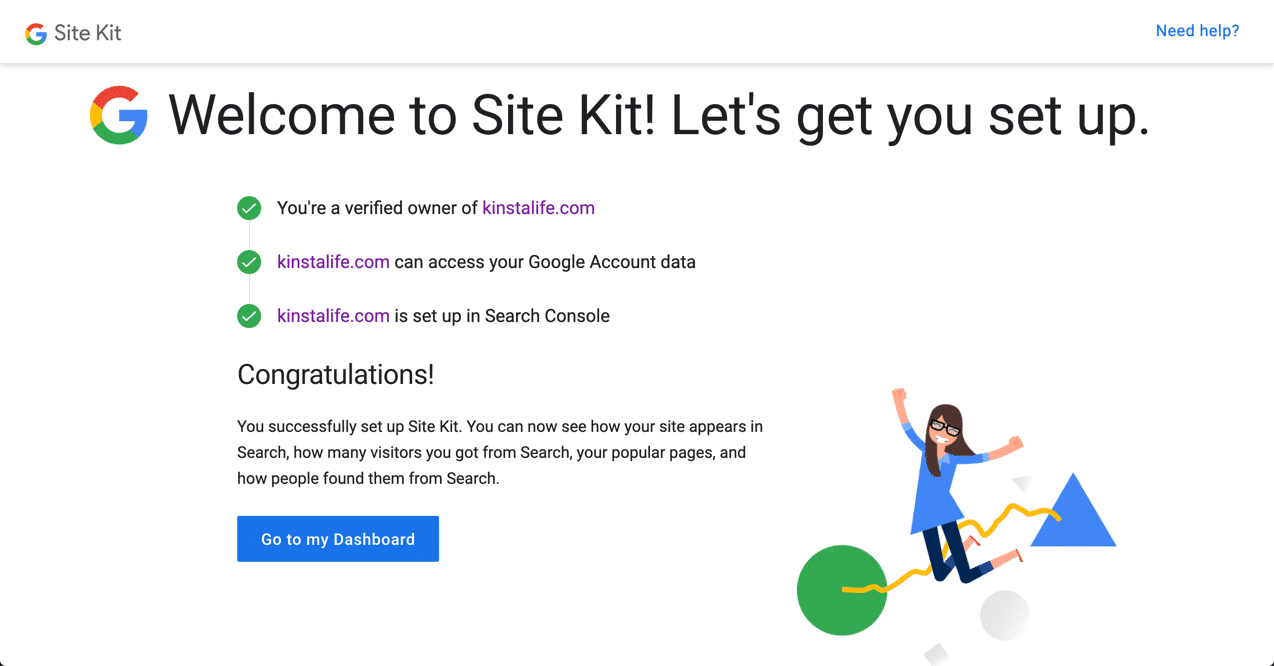
When done, you’ll be required to connect your WordPress site to your Analytics account.
As you might expect, you’ll need to go through a few steps to verify you’re the owner of the domain, grant access to Google to its data, and set up each service you’d like to add to WordPress.
Google Site Kit successful setup
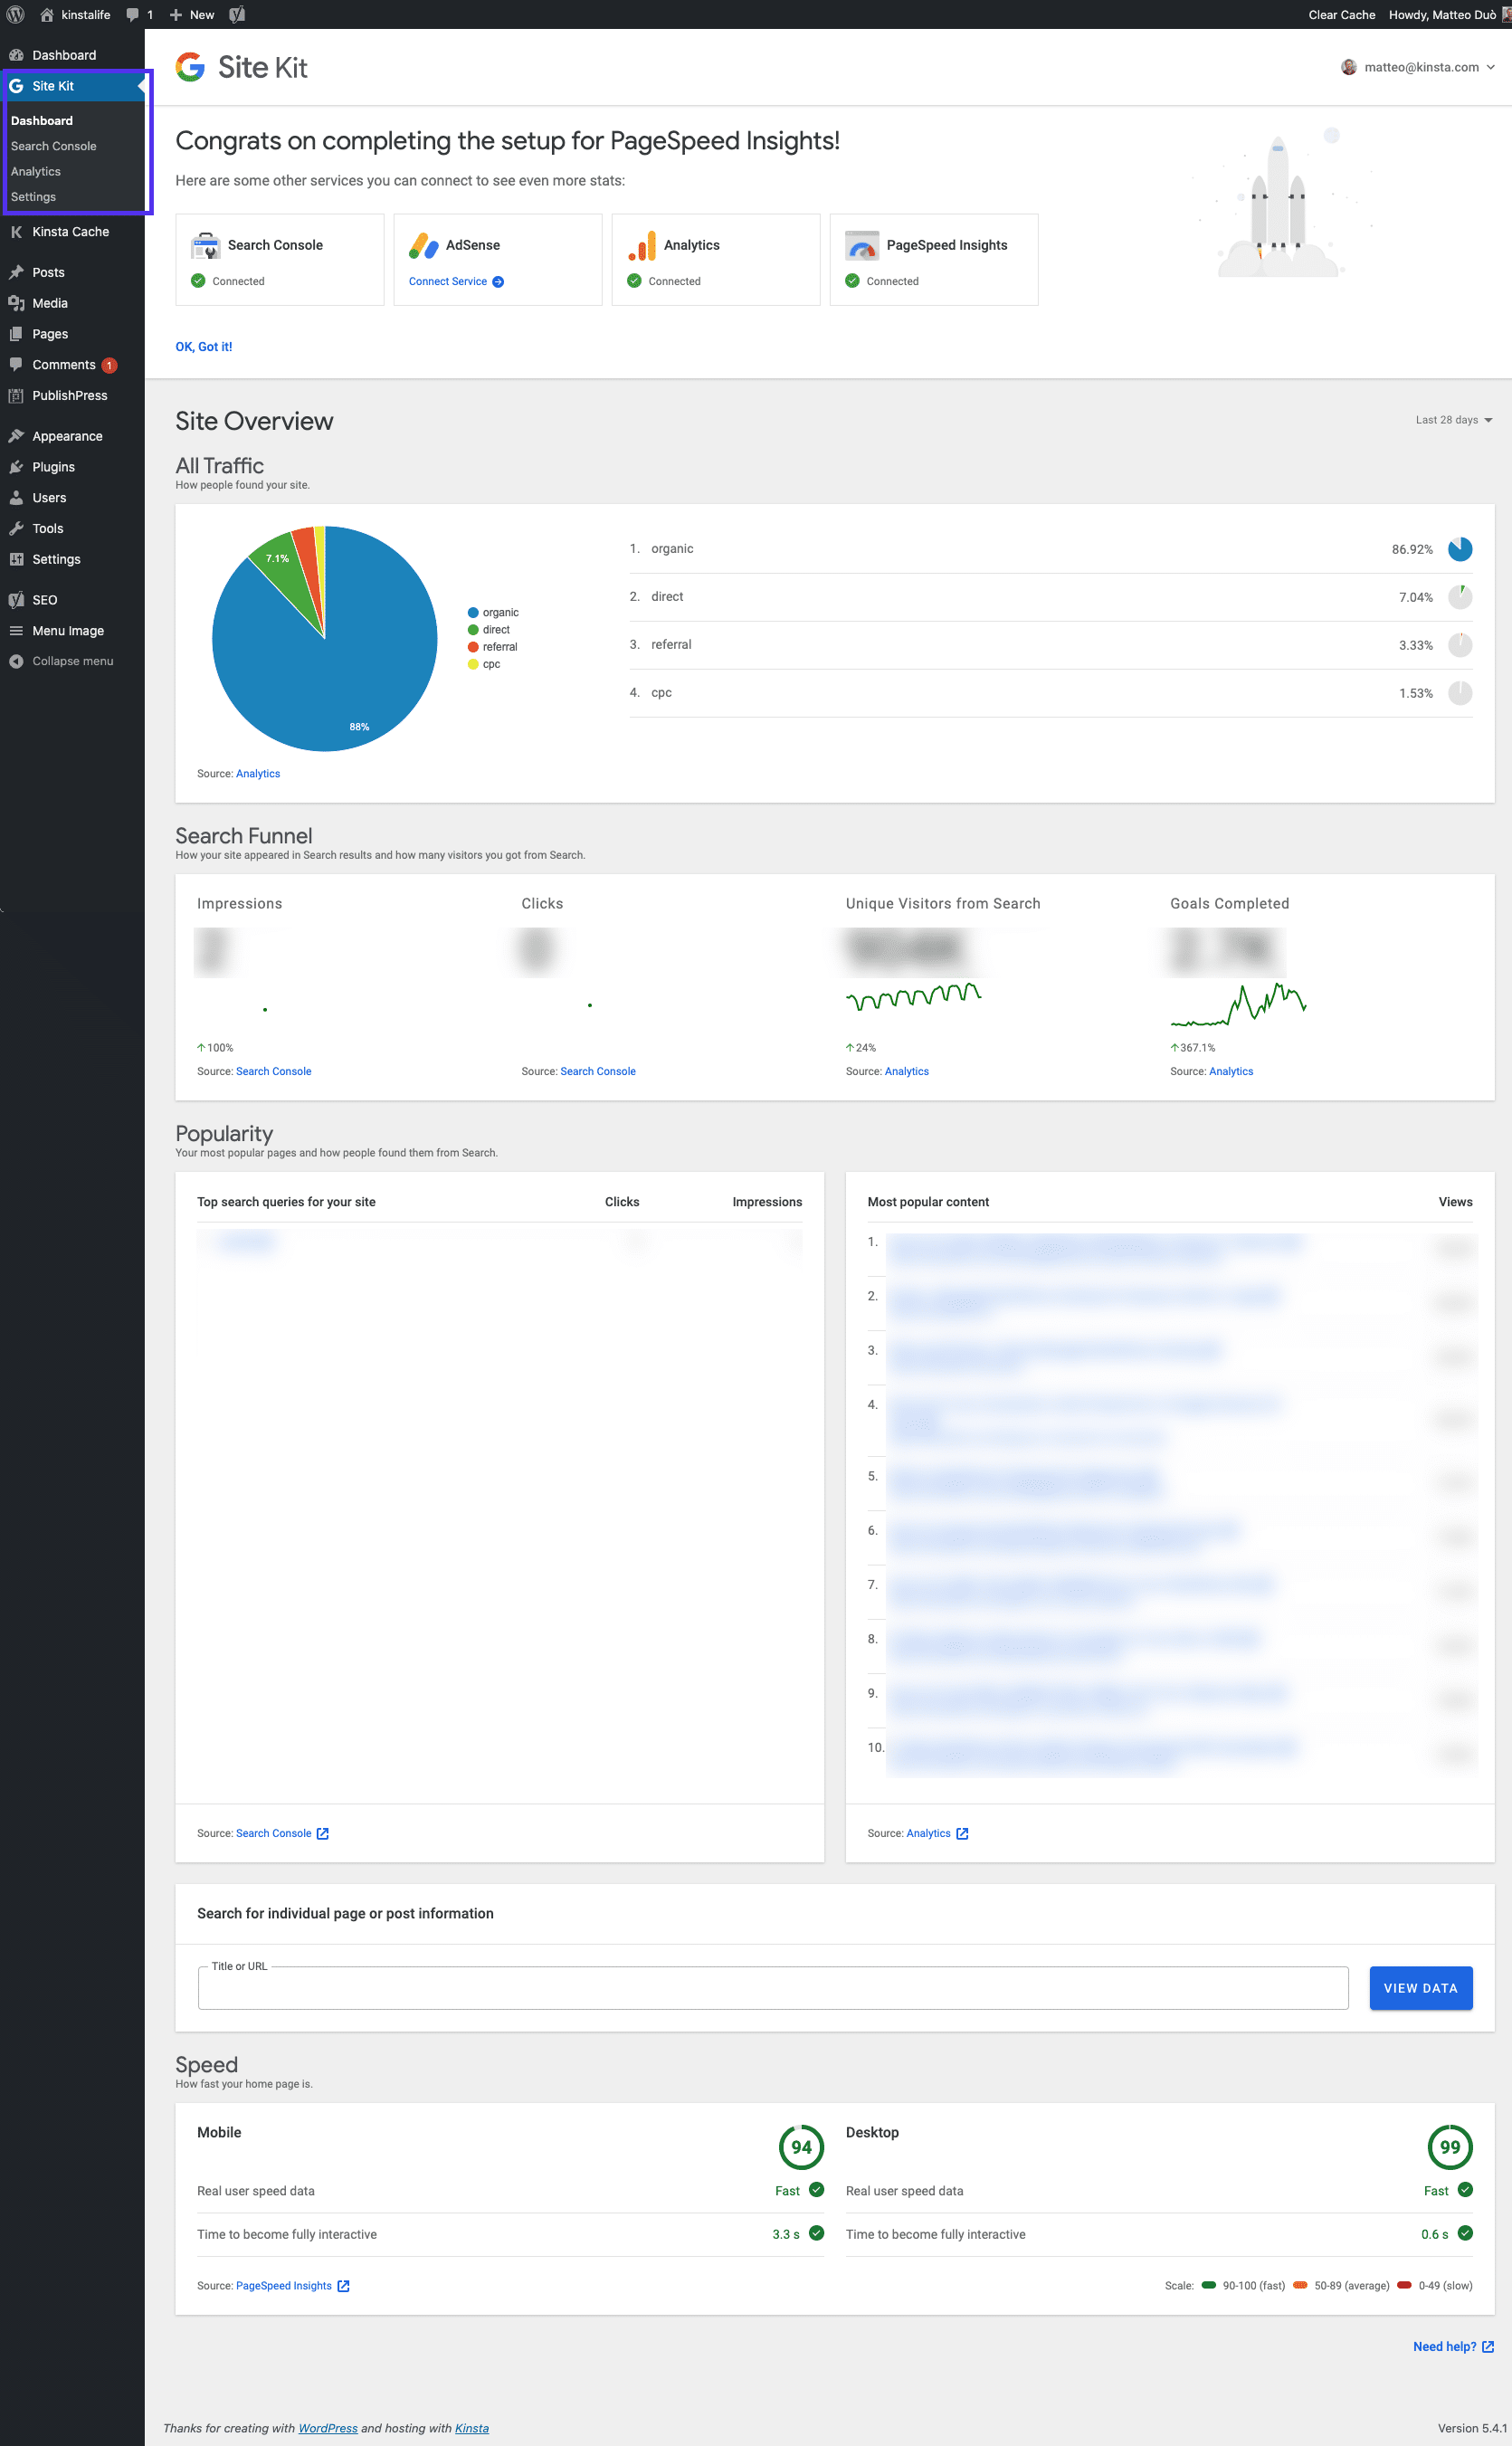
When successfully connected with your Google account, you’ll be then able to see data from Google Analytics along with all other services activated directly in your WordPress dashboard. Here’s how it looks:
Google Site Kit dashboard
All this data will always be reachable directly within WordPress in your left-hand sidebar.
If this plugin is too much for you and want to keep things focus primarily on Google Analytics, you could use the next plugin.
3. GA Google Analytics
The free GA Google Analytics plugin by Jeff Starr has over 400,000 active installs and a five-star rating:
GA Google Analytics WordPress plugin
The Google Analytics Admin tab
Accessing the Google Analytics tracking code under the property information
Accessing the Google Analytics tracking ID
In your WordPress dashboard, navigate to Settings > Google Analytics. Scroll down to Plugin Settings and add your tracking code in the relevant field:
GA Google Analytics WordPress plugin settings page
This plugin allows you to also choose whether you’d like the tracking code to be placed in your header vs footer, add custom tracking code, force SSL, disable tracking for your admin users, and a few other useful options.
Once tweaked to your needs, scroll down and click on the Save Changes button. Google Analytics should now be active on your WordPress site.
2. Manually Connect Google Analytics and WordPress with Code
If you’d prefer not to use a plugin, it’s also fairly simple to add the Google Analytics tracking code directly to your WordPress theme via your functions.php file.
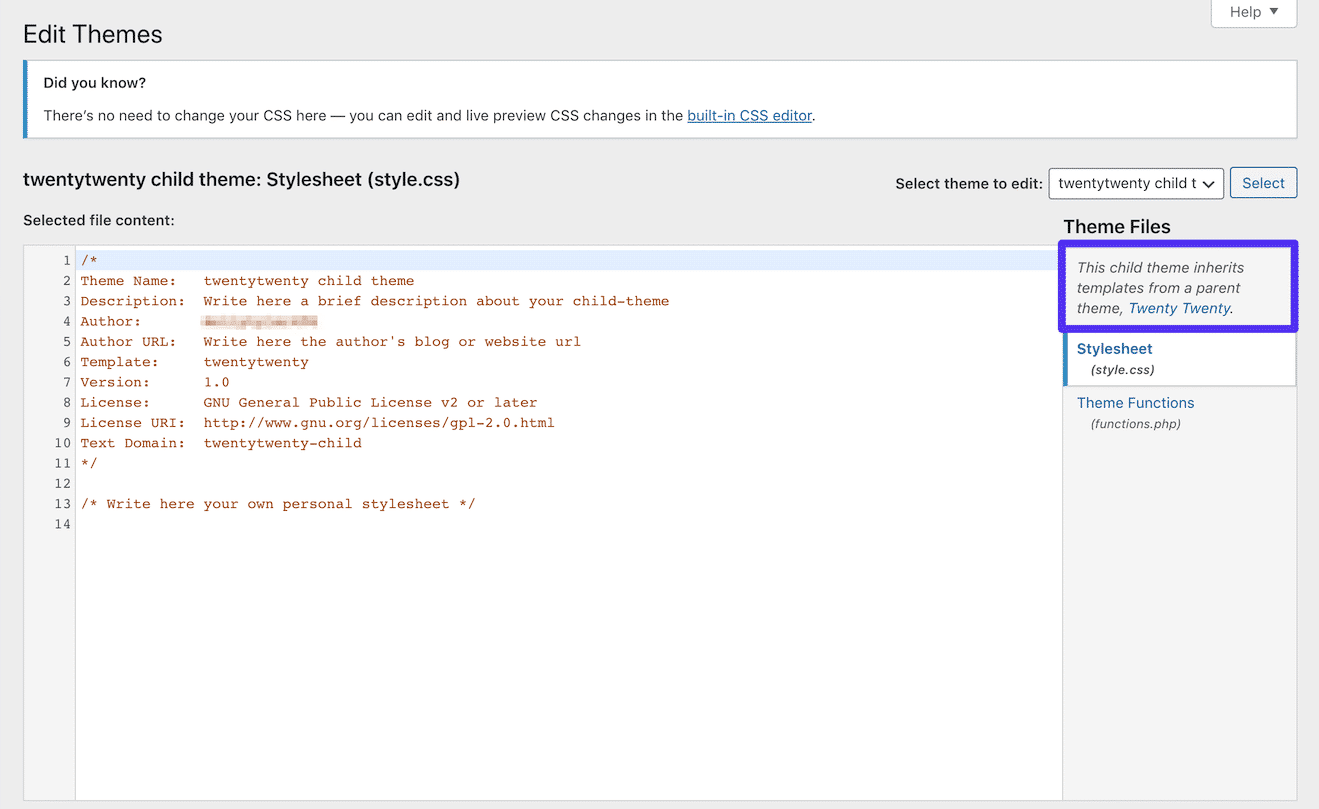
If you go the manual route, it’s essential that you use a child theme so that your tracking code won’t be overwritten every time you update your WordPress theme. Before you make any changes, though, it’s always good practice to make a backup.
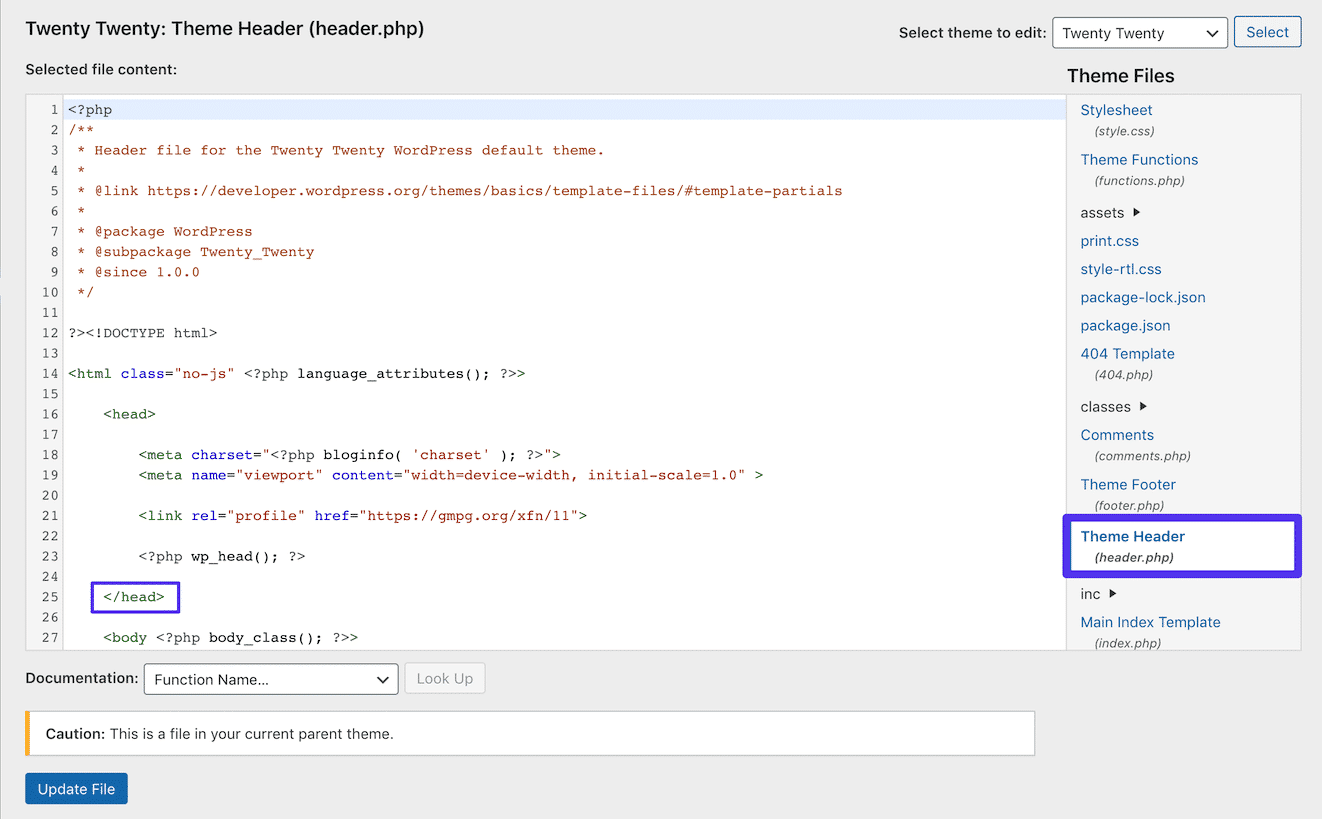
Once your child theme is active, you’ll need to paste your Google Analytics Tracking Code right before the closing </head> tag in your header.php file.
Copying the Google Site Tag code
To add it to your WordPress site, go to Appearance > Theme Editor. If your child theme is inheriting template files from its parent, you won’t see header.php here. You can click on the name of your parent theme in the file list to access it:
The WordPress Theme Editor for a child theme
Once you’ve located and selected header.php, paste the Google Analytics Tracking Code right before the </head> tag in the Editor:
Editing the header.php file in WordPress
Then, make sure to click on the Update File button. Google Analytics tracking code is now being added to WordPress.
3. Integrate Google Analytics and WordPress with Google Tag Manager
Another method you can use to add Google Analytics to WordPress is using Google Tag Manager. This is really meant for sites that incorporate scripts for a variety of purposes, not solely analytics.
Google Tag Manager is a tag management system. It allows you to quickly and easily update tags and code snippets on your website or mobile app, such as those intended for traffic analysis and marketing optimization.
You can add and update scripts from the Tag Manager user interface, instead of editing site code in WordPress. This reduces errors and frees you from having to involve a developer when configuring tags.
The easiest way to do this is to use the free Google Tag Manager WordPress plugin. It currently has over 300,000 active installs and a five-star rating:
Google Tag Manager for WordPress plugin
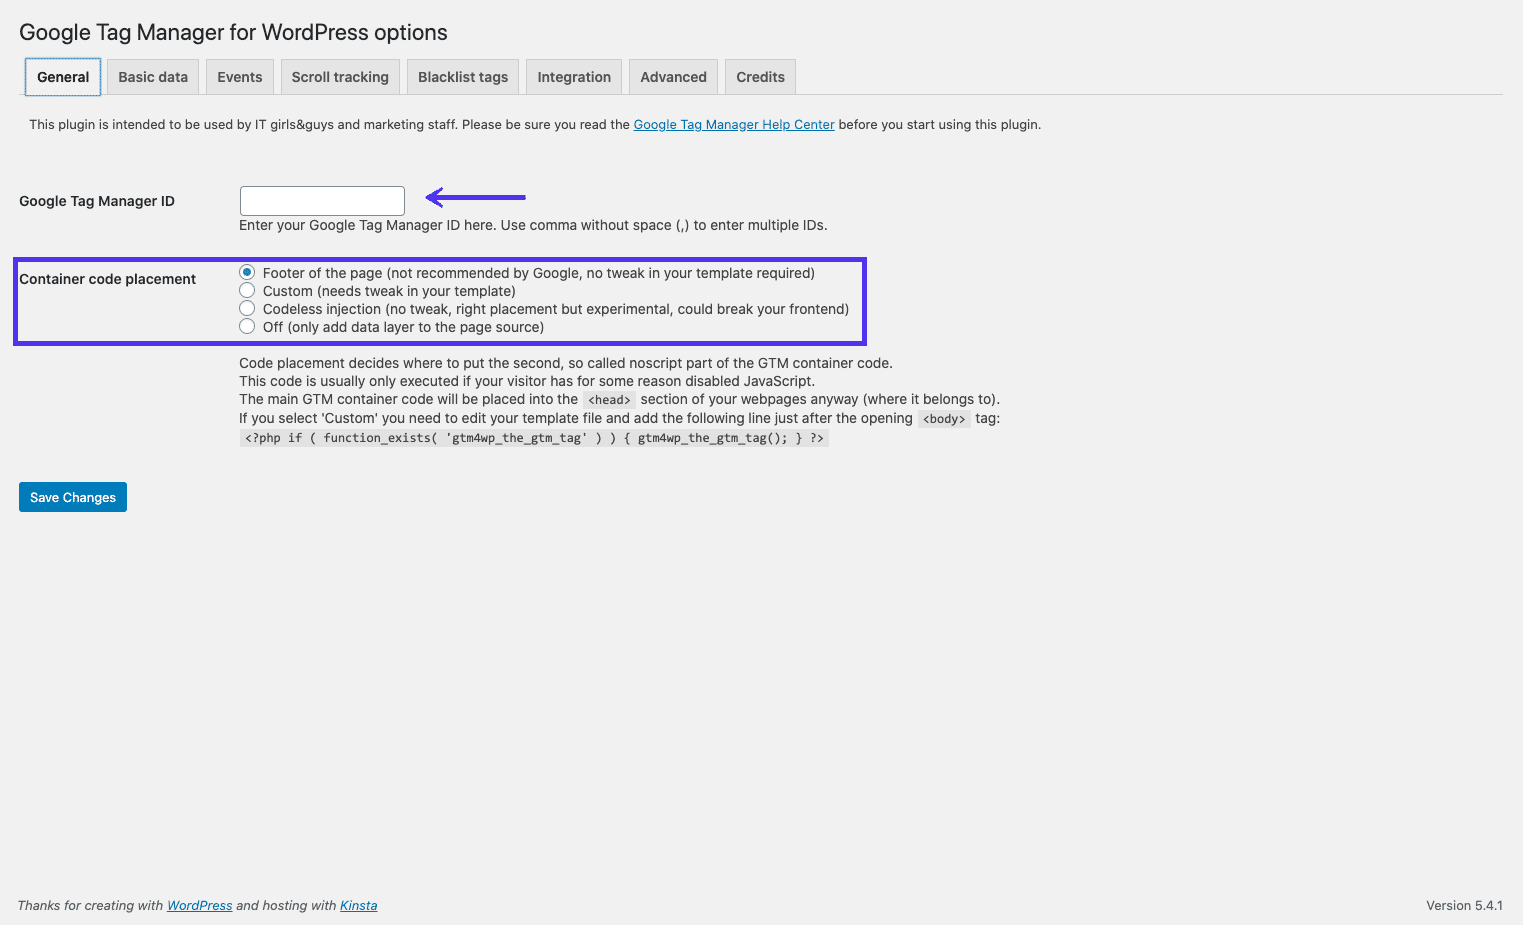
You can download the Google Tag Manager plugin from the WordPress repository or by searching for it under Plugins > Add New in your WordPress dashboard. You will then need to sign up for a Google Tag Manager account and create your first container.
Finding the container ID in Google Tag Manager
Then return to your WordPress site and paste your Google Tag Manager ID into the relevant field on the plugin‘s settings page. You can get there by navigating to Settings > Google Tag Manager:
Adding the container ID to the Google Tag Manager plugin
Any tag you set up in Google Tag Manager (including the one for Google Analytics) will now work on your WordPress site via the plugin.
4. Sync Google Analytics Locally for Performance Reasons
The final method you can use is to sync the Google Analytics script locally on your own server. Please be aware that this method isn’t supported by Google.
However, there are a couple of reasons you might want to do this. First, syncing Google Analytics locally can reduce your external HTTP requests. Additionally, you’ll have full control over the caching of the file so you can use your own server’s cache headers.
An example Google Analytics warning
The problem is that by default, Google Analytics has a two-hour cache time, as you can see in the warning above. This is likely because if Google needs to modify something on its end, it wants all users to have access to the changes as fast as possible.
By hosting the Google Analytics script on your own server, you can change the cache time to improve performance.
Syncing Google Analytics Locally with the Complete Analytics Optimization Suite
To get started, we recommend using the Complete Analytics Optimization Suite (CAOS), a free plugin created and developed by Daan van den Bergh. It currently has over 20,000 active installs with a five-star rating:
CAOS | Host Google Analytics Locally WordPress plugin
You can download it from the WordPress repository, or by searching for it under Plugins > Add New in your WordPress dashboard.
The CAOS allows you to host your Google Analytics JavaScript file (analytics.js) locally and keep it updated using wp_cron(). Other features enable you to:
- Anonymize the IP address of your visitors.
- Set an adjusted bounce rate.
- Change the placement of the Google Analytics script (header or footer).
You’ll need to deactivate any analytics plugin you already have installed before using it.
When you install CAOS and enter your Google Analytics Tracking ID, the plugin adds the necessary code for Google Analytics to your WordPress website. It then downloads and saves the analytics.js file to your server, and keeps it updated using a scheduled script in wp_cron().
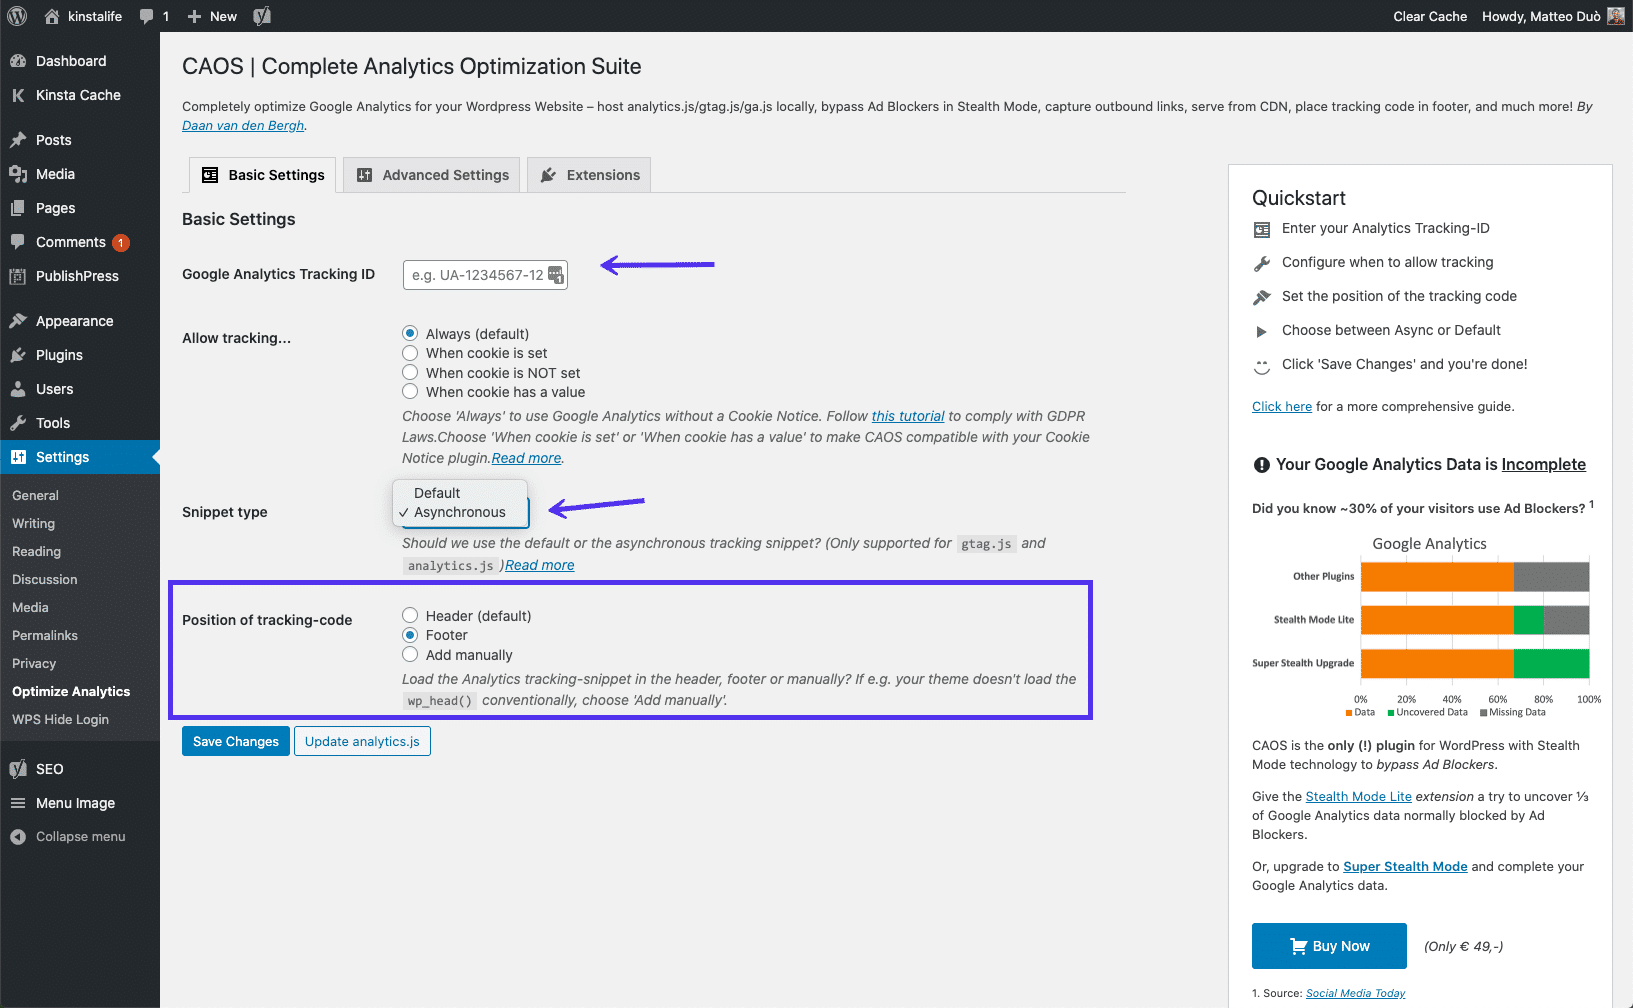
We recommend setting the script to load in the footer by going to Settings > Optimize Analytics and selecting the Footer option under Position of tracking code:
Settings to sync Google Analytics locally
It’s important to note that CAOS doesn’t work with other Google Analytics plugins.
Syncing Google Analytics Locally With Perfmatters
Perfmatters WordPress plugin
Among its many features, there’s also an option to sync Google Analytics locally by entering your tracking ID. Like CAOS, you can also set the script to load in your footer instead of your header.
Summary
Google Analytics is a vital tool for website owners and managers, although not the only analytics tool available you could use.
Tracking your site’s user activity, referral sources, and other data is key to growing your audience and your brand. To connect Google Analytics to your WordPress site, you can use one of the following ways:
- Add Google Analytics to WordPress with a plugin (MonsterInsights or Site Kit or GA Google Analytics).
- Manually connect Google Analytics and WordPress by adding code directly to your theme.
- Integrate Google Analytics and WordPress using Google Tag Manager (easy with a plugin such as Google Tag Manager WordPress).
- Sync Google Analytics locally for performance reasons (using the CAOS or Perfmatters plugins).
Have any thoughts or different methods you use to add Google Analytics to WordPress? If so, we would love to hear them!


