How to install phoenix os on virtual box
This article guide you for “how to install Phoenix OS in Virtual Box”. There are many ways to install Phoenix OS in your PC. You can dual boot Phoenix OS with Windows and it is Permit to you choose one of the Operating System at the boot time.
But, If you want to install Phoenix OS without making any changes in your Windows Operating System then you choose Virtual Machine way. Using Virtual Machine You can enjoy all the features of Phoenix OS as well as Windows or which OS are use.
In this tutorial, I will show you how to install Phoenix OS in Virtual Machine in Windows:
Requirements-
- Minimum 4 GB RAM and 8 GB RAM recommended
- At least 16 GB free Disk Space
Installation-
Step 1- Download and Install Virtual Box
Go to the site of Oracle Virtual Box and download the latest stable version here:
Installing a Virtual Box is not a very hard thing. Just Double Click on the downloaded Virtual Box exe file and follow the instructions which shows on the your laptop screen. It’s like Installing a regular software on your windows.
- Step 2- Download Phoenix OS ISO
After, you need to download ISO file of Phoenix OS distribution. You can get this file to the official website of Phoenix OS or easily download to here:
- Step 3- Install Phoenix OS using Virtual Box
- You have installed Virtual Box and download the ISO file for Phoenix OS distribution. Next, you are now set to install Phoenix OS in Virtual Box.
2. Start the Virtual Box and Click on the New symbol. Give the suitable name to Virtual Box and select type as “Other” and version as “Other/Unknown (64bit)”.
3. Allocate Ram in in the Virtual OS. In my system have a 16GB ram so I give a 4096GB ram to the Virtual Os. You use a more ram for Virtual OS If your system have a sufficient extra ram.
4. Create a Virtual disk. This disk work as a hard disk of the Virtual Phoenix OS System. Here Virtual Machine store all the files of Virtual OS.
5. I will recommend use VDI file type here.
6. You can select either of the option Dynamically allocated or Fixed size for creating a Virtual Hard Disk.
7. The recommended size is 16GB. However, I suggest more size if possible. 30-40 GB is more ideal size for Virtual Hard Disk.
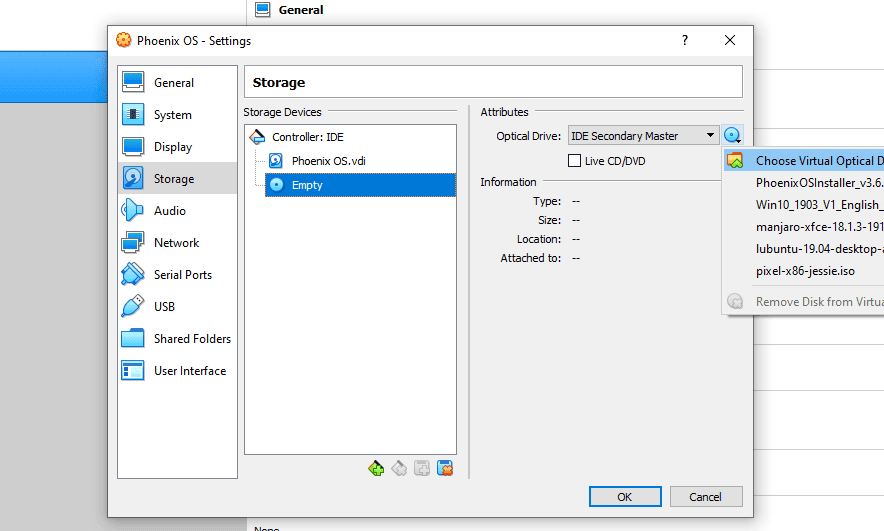
8. Now, we have to set up the Phoenix OS ISO file which you downloaded in step 2 . For setup the Phoenix OS ISO file-
- Click ‘Storage’
- Click ‘Empty’
- In Attributes click on disk Image and “Choose Virtual Optic Disk File”
- Now, Select your Downloaded Phoenix OS ISO file and open it.
9. When everything is set it’s time to boot the Phoenix OS and install Phoenix OS in your Virtual Machine as a Virtual OS.
10. After clicking the start option, a Phoenix OS Install Windows is appear. Here, click “install Phoenix OS to Hard Disk” option and press Enter.
11. After, Click “Create/Modify Partition” option and then press Enter. After this it’s show prompt “Do you want to use GPT?”, click No and press Enter.
12. Now, new Windows appears, here you click “new” and press Enter, select “Primary” and press Enter, give size to partition and press Enter.
13. Then give bootable flag to this partition by clicking on the bootable flag.
14. Now, Click “Write” and press Enter, after this it’s need confirmation to write changes in a disk, so, write “yes” and press Enter.
15. Now, Click “quit” and press Enter.
16. Select “SDA1” and press Enter. Then format partition as “ext4″.
17. Now, click no for “Do you want to install EFI GRUB2?” and click yes for “Do you want to install boot loader grub?”.
18. Now, It’s installing phoenix OS. When the Installation is finishes then Power OFF the system and go to Storage > Setting and Remove Phoenix OS ISO file.
19. Now , Start the Machine again.
19. Hurry, Your Phoenix OS is starting…(It’s take 5-10 minutes depending on your PC/Laptop).
Install Kali Linux in Virtual Box.
So, Let’s enjoy your Phoenix OS in Virtual Box!

Note: When your Virtual Machine is lack then close the Virtual Machine and restart.