How to install MacOS Big Sur on Windows PC using VMWARE
In this post, I am going to show you How to install MacOS Big Sur on Windows PC using VMWARE. So, Apple announced its latest and greatest operating systems in WWDC 2020. If you want to give macOS Big Sur Beta a try, then you’re in the right place. So, without wasting any more time, let’s jump into it.
Steps to Install macOS Big Sur on VMware
I’ll show you how you can install macOS Big Sur on your Windows 10 computer in seven easy steps. The steps are as follows:
- Download and install the prerequisites.
- Enable virtualization on your Windows PC.
- Download and install Workstation Pro/Player on your PC.
- Unlock VMware to Install macOS Big Sur on Windows.
- Create a New Virtual Machine for macOS Big Sur on Windows 10.
- Edit the macOS Big Sur VMX File.
- Install macOS Big Sur on VMware on a Windows 10 PC
- Complete Installation Process
- Install VMware Tools to Fix the Screen resolution
- Activate Drag and Drop
See Our Other Article, How to Install macOS Ventura on VMWare
Step 1. Download and install the prerequisites
First and foremost, there are some prerequisites applications that you need to download to install macOS Big Sur on Windows PC via VMWare.
- Get VMware Workstation Pro
- Download macOS Unlocker V3 for VMware Workstation
- Download macOS Big Sur ISO
Once you’ve downloaded these files in your system, jump to the next section.
Step 2. Enable Virtualization on Your Windows PC
Modern CPUs contain hardware virtualization technologies that help in the acceleration of virtual machines generated by VMware Workstation. To use this functionality, however, you must first enable it. Please bear in mind that virtualization must be enabled on your system. Otherwise, you will receive the error message “Can’t open a session on the virtual machine.”
To check if your PC has the Virtualization chip on the motherboard, whether it is enabled or No, follow the below steps.
- Open Task Manager by pressing Ctrl + Shift + ESC.
- If you are opening the task manager for the first time, click on more options at the bottom.
- Go to the performance tab> click on the CPU.
- Check the status of the virtualization.
If the virtualization is not enabled, you have to visit the BIOS of your computer and enable it. A full detailed step-by-step guide on how to enable virtualization on Dell, HP, ASUS, and other brands is guided in the below post. First, configure the Virtualization tech, then move on to the next step.
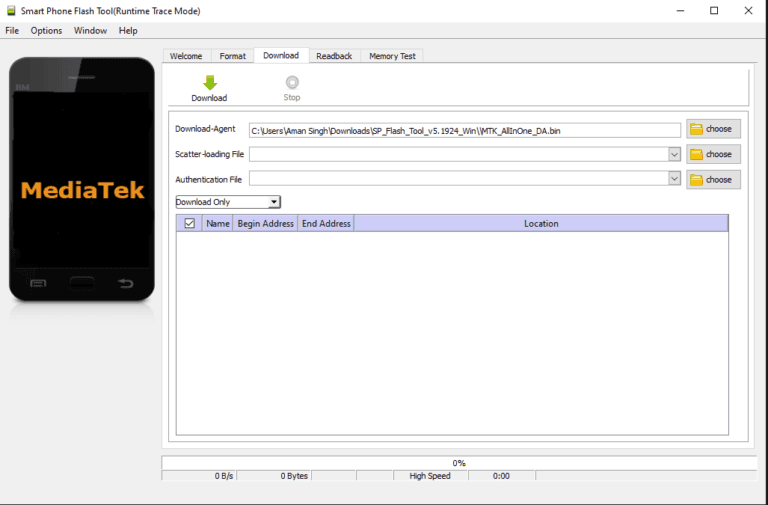
Step 3: Install VMware Workstation
I presume all the above-mentioned applications are downloaded into your system. Now primarily, install the VMware Workstation Pro 16 or VMware Workstation Player 16. You don’t need to download and install both applications but install either one. Here we’ll show you VMware Workstation Pro 16 as an example.
- Right-click on the VMware workstation file that you’ve downloaded.
- Extract the zip file.
- Click on the setup file and follow the on-screen instruction to complete the setup.
- Agree to the Terms & Conditions.
- Click Next, Next, and complete the steps.
- Install and Finish the setup.
Step 4: Unlocking VMware to Install macOS Big Sur on Windows
- Close the VMware Workstation completely from the background. Click on File in the top menu bar and select Exit.
- Have you downloaded macOS Unlocker for VMware? If yes, then extract the zip file. Locate win-install.cmd and right-click and select Run as administrator.
- Complete the setup process following the on-screen instructions.
Step 5: Create a New Virtual Machine on VMware
The next step is to create a new virtual machine that will help to install macOS Big Sur on Windows PC.
- Launch VMware on your PC.
- Select Create a New Virtual Machine.
- Choose Typical(Recommended). Click Next.
- Select I will install the operating system later and click Next.
- From the guest operating system, go with Apple Mac OS X and choose macOS 11.
- Give the virtual machine a name, like MacOS Big Sur and set a location, and click Next.
- Now increase the disk size to 100GB and choose Store virtual disk as a single file. Click Next.
- Select Customize Hardware.
- Set the memory size to 8GB and Processor to 4; this will ensure better performance.
- Choose New CD/DVD(SATA) from the menu. Go with use iso image file and Browse.
- Locate and open the macOS Big Sur ISO File.
- Lastly, Close and save all the changes and Finish the setup.
Step 6: Edit MacOS Big Sur VMX File
Up next is to configure the macOS Big Sur VMX File. Earlier, you’ve selected the location; remember, go to that location, MacOS Big Sur VMX file will be there. And if you haven’t selected any location, then here’s a default file location.
C:\Users\Bruker\Documents\Virtual Machines\macOS Big Sur
Right-click on the macOS Big Sur VMX file and open it in Notepad.
For Intel CPU:
If your laptop or computer uses Intel CPU then at the end of the file, add the following code:
SMC.version = “0”
For AMD CPU:
If your laptop or computer uses AMD CPU then at the end of the file, add the following code:
- smc.version = “0”
- cpuid.0.eax = “0000:0000:0000:0000:0000:0000:0000:1011”
- cpuid.0.ebx = “0111:0101:0110:1110:0110:0101:0100:0111”
- cpuid.0.ecx = “0110:1100:0110:0101:0111:0100:0110:1110”
- cpuid.0.edx = “0100:1001:0110:0101:0110:1110:0110:1001”
- cpuid.1.eax = “0000:0000:0000:0001:0000:0110:0111:0001”
- cpuid.1.ebx = “0000:0010:0000:0001:0000:1000:0000:0000”
- cpuid.1.ecx = “1000:0010:1001:1000:0010:0010:0000:0011”
- cpuid.1.edx = “0000:0111:1000:1011:1111:1011:1111:1111”
- smbios.reflectHost = “TRUE”
- hw.model = “MacBookPro14,3”
- board-id = “Mac-551B86E5744E2388”
Save the notepad file.
Step 7: Starting macOS Big Sur Virtual Machine
It’s time to start the MacOS Big Sur Virtual Machine.
- Launch VMware and select Power on this virtual machine.
- Choose preferred Language and move forward.
- Select Disk Utility > Continue.
- Select VMware Virtual SATA Hard Drive Media and click Erase.
- Enter a name like HDD > select Mac OS Extended(Journaled) format and click Erase.
- To close the dialogue box, click Done.
- In the top menu, select Disk Utility and Quit Disk Utility.
- Select Install macOS Big Sur Beta and Continue.
- Agree with Terms and Conditions.
- Follow on-screen dialogue boxes and choose the available disk.
- Your system will restart several times while installing macOS Big Sur . Wait for a while until the installation process completes. If you face any error, comment us.
Step 8: Complete Installation Process
Now let’s complete the basic macOS account settings before using the macOS Big Sur .
- Choose country and region.
- Choose a Keyboard Layout and click Continue. If you don’t agree with preset options then you customize it. Just click Customize Settings.
- The next screen will ask you to set up Accessibility options which include, Motor, Vision, Hearing, and Cognitive. Complete setup or choose Not Now.
- Have a look at the Data & Privacy > Continue.
- Select Not Now on the Migration Assistant page.
- Click Setup Later when you’re asked to sign in with Apple ID.
- See Terms & Conditions? Read and Agree to them.
- Enter your Full Name, Account Name, Password, Password Hint, and Continue.
- If you want to customize Express Set Up, you can click on Customize Settings otherwise click on Continue.
- On the Analytics page click Continue.
- On-Screen Time, click Set up Later.
- Select an appearance theme and click Continue. Here you choose your dark mode if you want.
Finally, you’ve successfully installed macOS Big Sur on Vmware in Windows 10.
Step 9. Install VMware Tools to Fix the Screen resolution
You can say that VMWare tools are the driver of the guest operating system. When you install the VMWare tools, it’s going to fix the graphics, it will fix the screen resolution, and you can enable the drag and drop between the host and the virtual machine. And besides, its sound and other hardware parts are not working through installing the VMWare tools they are going to fix mostly those issues.
Step 10. Activate Drag and Drop
The other step which is required for the users who want to share the file between their virtual machine of MacOS Big Sur and the windows host is the drag and drop. This is required whenever you are trying to copy the files between the virtual machine and the host. If you use an external hard drive you can also use it but it’s going to take a lot of time and besides the resources will be used quite a lot compared to the drag and drop.
The first step to enable the drag and drop between the two operating systems is to install the VMWare tools which we already did to fix the screen resolution. Now for the next step, there is a small setting that is located within the system preferences in the accessibility category. It must be enabled from there.
- At the top-level menu click on the apple icon and choose system settings.
- Access privacy and security.
- Within privacy and security, you have to find accessibility.
- Once you are inside the accessibility, you will see a tool listed there, it is called VMWare tools daemon. Toggle it to turn it on and then insert your password to confirm the changes.
Go ahead and now enjoy drag and drop between the host and the virtual machine.
Conclusion
That’s how you can Install macOS Big Sur on VMware on Windows 10 PC and laptop with ease and with a step-by-step guide. If you have any kind of questions or encounter any kind of problem, please let me know in the comment section. Good Luck!