Tic Tac Toe Android App Tutorial Using Android Studio
Welcome to Tic Tac Toe Android App Tutorial using Android Studio. In this post we will build a Tic Tac Toe game for android using Android Studio. This game would be impossible to beat because we are going to use the MiniMax Algorithm here.
If you want to see the final app that we will build in this series then you can see this video.
The key point of this app is the MiniMax Algorithm that makes this Tic Tac Toe algorithm. So if you want to learn how you can build this game then keep reading.
See our other article, How to Make a Tic Tac Toe Game in Android using JAVA
Building Tic Tac Toe Android App
Creating an Android Studio Project
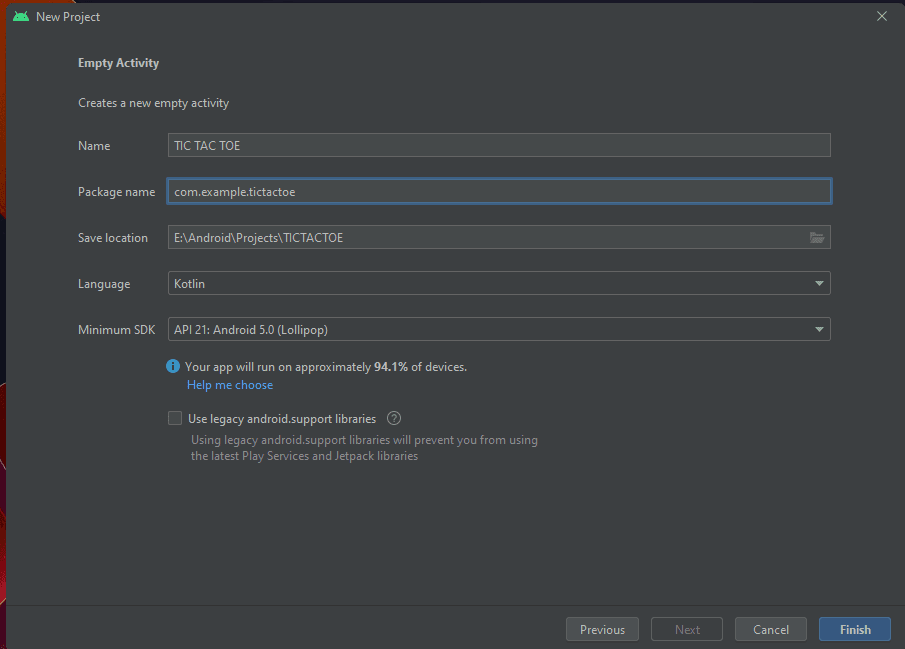
As always we will start by creating a new Android Studio project.
- Create a new project named Tic Tac Toe using an Empty Activity.
When you are in the above screen, make sure you select the Language as Kotlin.
Adding new Material Design
- Now first we will add the new material design dependency (It is already added but if not then add this manually). So go inside app level build.gradle file and add this line.
implementation 'com.google.android.material:material:1.4.0'
- Once we have added this dependency and synced our project, we will change our applications theme inside themes.xml.
<resources xmlns:tools="http://schemas.android.com/tools">
    <!-- Base application theme. -->
    <style name="Theme.AppProjectName" parent="Theme.MaterialComponents.DayNight.DarkActionBar">
        <!-- Primary brand color. -->
        <item name="colorPrimary">@color/colorPrimary</item>
        <item name="colorPrimaryDark">@color/colorPrimaryDark</item>
        <item name="colorAccent">@color/colorAccent</item>
        <!-- Secondary brand color. -->
        <item name="colorSecondary">@color/teal_200</item>
        <item name="colorSecondaryVariant">@color/teal_700</item>
        <item name="colorOnSecondary">@color/black</item>
        <!-- Status bar color. -->
        <item name="android:statusBarColor" tools:targetApi="l">?attr/colorPrimaryVariant</item>
        <!-- Customize your theme here. -->
    </style>


</resources>
Creating Game UI
- First you need some drawable resources to make the UI as you see below. You can get the drawables from this link.
- After downloading the drawables paste them inside the drawable folder of your project.
- Now define the following colors in your colors.xml file.
<?xml version="1.0" encoding="utf-8"?>
<resources>
    <color name="purple_200">#FFBB86FC</color>
    <color name="purple_500">#FF6200EE</color>
    <color name="purple_700">#FF3700B3</color>
    <color name="teal_200">#FF03DAC5</color>
    <color name="teal_700">#FF018786</color>
    <color name="black">#FF000000</color>
    <color name="white">#FFFFFFFF</color>
    <color name="colorPrimary">#8BC34A</color>
    <color name="colorPrimaryDark">#4CAF50</color>
    <color name="colorBackground">#4CAF50</color>
    <color name="colorAccent">#8BC34A</color>
</resources>- Come inside activity_main.xml and write the following xml code.
<?xml version="1.0" encoding="utf-8"?>
<RelativeLayout
    xmlns:android="http://schemas.android.com/apk/res/android"
    xmlns:tools="http://schemas.android.com/tools"
    xmlns:app="http://schemas.android.com/apk/res-auto"
    android:layout_width="match_parent"
    android:background="@color/colorBackground"
    android:layout_height="match_parent"
    tools:context=".MainActivity">

    <ImageView
        android:id="@+id/image_view_name"
        android:layout_marginTop="20dp"
        android:layout_centerHorizontal="true"
        android:layout_alignParentTop="true"
        android:background="@drawable/app_name"
        android:layout_width="280dp"
        android:layout_height="55dp"/>

    <TextView
        android:id="@+id/text_view_result"
        android:layout_width="wrap_content"
        android:layout_height="wrap_content"
        android:layout_above="@id/layout_board"
        android:layout_centerHorizontal="true"
        android:layout_marginBottom="25dp"
        android:fontFamily="sans-serif"
        android:textAllCaps="false"
        android:textAppearance="@style/TextAppearance.AppCompat.Headline"
        android:textColor="@android:color/white"
        android:textSize="30sp"
        android:textStyle="bold"
        app:fontFamily="monospace"
        tools:text="Player Won" />

    <GridLayout
        android:padding="16dp"
        android:alignmentMode="alignBounds"
        android:useDefaultMargins="true"
        android:layout_centerInParent="true"
        android:rowCount="3"
        android:columnCount="3"
        android:id="@+id/layout_board"
        android:layout_width="wrap_content"
        android:layout_height="wrap_content"/>

    <Button
        android:layout_marginBottom="15dp"
        android:layout_centerHorizontal="true"
        android:layout_alignParentBottom="true"
        android:id="@+id/button_restart"
        android:textAllCaps="false"
        android:text="Restart"
        android:layout_width="wrap_content"
        android:layout_height="wrap_content"/>
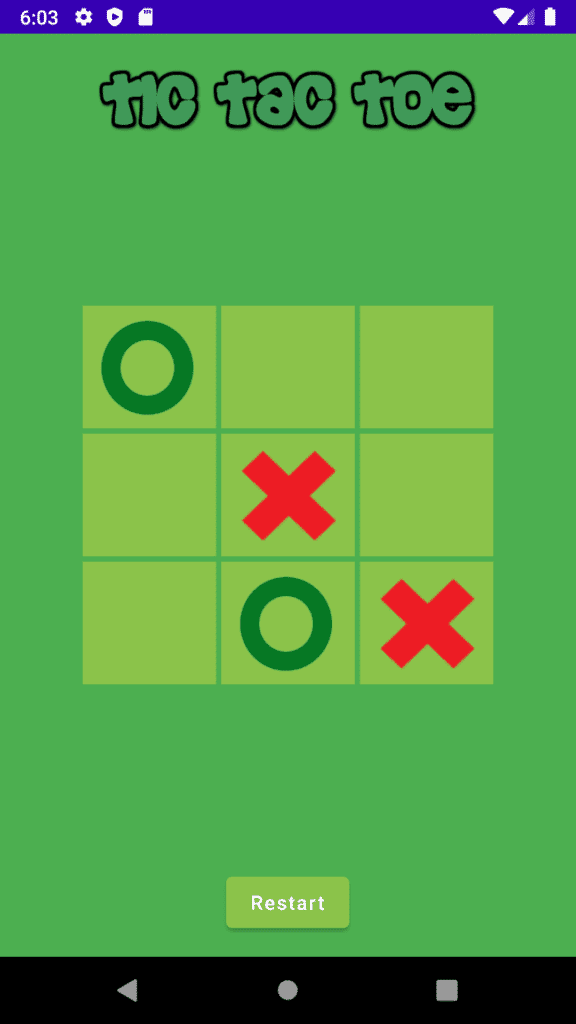
</RelativeLayout>- The above code will generate the following layout.
- Below the “Computer Won” text we have the GridLayout that is not visible because we have nothing inside. Inside this GridLayout we will generate our Tic Tac Toe board.
Generating Tic Tac Toe Board
- Now come inside MainActivity.kt and here we will create a function to display the tic tac toe board. Here we are generating the board using a 3 by 3 ImageView array.
class MainActivity : AppCompatActivity() {

    //Creating a 2D Array of ImageViews
    private val boardCells = Array(3) { arrayOfNulls<ImageView>(3) }

    override fun onCreate(savedInstanceState: Bundle?) {
        super.onCreate(savedInstanceState)
        setContentView(R.layout.activity_main)

        //calling the function to load our tic tac toe board
        loadBoard()
    }


    /*
    * This function is generating the tic tac toe board
    * */
    private fun loadBoard() {

        for (i in boardCells.indices) {
            for (j in boardCells.indices) {
                boardCells[i][j] = ImageView(this)
                boardCells[i][j]?.layoutParams = GridLayout.LayoutParams().apply {
                    rowSpec = GridLayout.spec(i)
                    columnSpec = GridLayout.spec(j)
                    width = 250
                    height = 230
                    bottomMargin = 5
                    topMargin = 5
                    leftMargin = 5
                    rightMargin = 5
                }
                boardCells[i][j]?.setBackgroundColor(ContextCompat.getColor(this, R.color.colorPrimary))
                layout_board.addView(boardCells[i][j])
            }
        }
    }
}- After writing the above code you can try running your application and you will see the following result.
- Bingo! we have generated our Tic Tac Toe board. Now we need to make the Player Movement. And for this we already pasted the drawable resources (Make sure you have the drawable resource for circle and cross in your drawable folder).
Adding Click Listener to Cells
When player wants to make a move, the player will tap on a cell. So first we will attach an OnClickListener on each cell (or each ImageView that is in our board or array).
- Inside your class MainActivity define an inner class that will implement the OnClickListener.
 inner class CellClickListener(
        val i: Int,
        val j: Int
    ) : View.OnClickListener {

        override fun onClick(p0: View?) {
            //here we will code the move
        }

    }
- Now we will attach it to each ImageView in our array, So inside loadBoard() function, just above the line where you are adding the cell to GridLayout add this line.
//attached a click listener to the board
boardCells[i][j]?.setOnClickListener(CellClickListener(i, j))
- If you are confused then here is the code of MainActivity after adding the above codes.
class MainActivity : AppCompatActivity() {

    //Creating a 2D Array of ImageViews
    private val boardCells = Array(3) { arrayOfNulls<ImageView>(3) }

    override fun onCreate(savedInstanceState: Bundle?) {
        super.onCreate(savedInstanceState)
        setContentView(R.layout.activity_main)

        //calling the function to load our tic tac toe board
        loadBoard()
    }


    /*
    * This function is generating the tic tac toe board
    * */
    private fun loadBoard() {

        for (i in boardCells.indices) {
            for (j in boardCells.indices) {
                boardCells[i][j] = ImageView(this)
                boardCells[i][j]?.layoutParams = GridLayout.LayoutParams().apply {
                    rowSpec = GridLayout.spec(i)
                    columnSpec = GridLayout.spec(j)
                    width = 250
                    height = 230
                    bottomMargin = 5
                    topMargin = 5
                    leftMargin = 5
                    rightMargin = 5
                }
                boardCells[i][j]?.setBackgroundColor(ContextCompat.getColor(this, R.color.colorPrimary))

                //attached a click listener to the board
                boardCells[i][j]?.setOnClickListener(CellClickListener(i, j))

                layout_board.addView(boardCells[i][j])
            }
        }
    }

    inner class CellClickListener(
        val i: Int,
        val j: Int
    ) : View.OnClickListener {

        override fun onClick(p0: View?) {
            //here we will code the move
        }

    }
}- Inside our click listener class (that is the inner class CellClickListener) we have two parameters i and j. This is because we want to know the index of the cell that is clicked.
Creating Board
- Now we need one more board. And this board is our actual board in which we will work internally. And the board that we generated above is just for the user visualization. When we will make any changes on the internal board we will also update the visual board which is the array of ImageView.
- For this internal board we will create a separate class and this class will contain a number of functions and properties. But before creating this class we need one more class to save the Cell of our Board.
- Create a data class named Cell and write the following code.
data class Cell(val i: Int, val j: Int)
- The above class will only store the indices of a particular cell.
- Now we will create one more class. So create a new file named Board.kt and write the following kotlin code.
class Board {

    //Strings for PLAYER and COMPUTER
    companion object {
        const val PLAYER = "O"
        const val COMPUTER = "X"
    }

    //This is our internal board
    //and for this we used a 3 by 3 array of Strings
    val board = Array(3) { arrayOfNulls<String>(3) }

    //This property is giving us
    //a list of all the empty cells
    val availableCells: List<Cell>
        get() {
            val cells = mutableListOf<Cell>()
            for (i in board.indices) {
                for (j in board.indices) {
                    if (board[i][j].isNullOrEmpty()) {
                        cells.add(Cell(i, j))
                    }
                }
            }
            return cells
        }

    //this property will tell
    //if the game is over or not
    val isGameOver: Boolean
        get() = hasComputerWon() || hasPlayerWon() || availableCells.isEmpty()


    //These functions are checking
    //Weather the computer or player has won or not
    fun hasComputerWon(): Boolean {
        if (board[0][0] == board[1][1] &&
            board[0][0] == board[2][2] &&
            board[0][0] == COMPUTER ||
            board[0][2] == board[1][1] &&
            board[0][2] == board[2][0] &&
            board[0][2] == COMPUTER
        ) {
            return true
        }

        for (i in board.indices) {
            if (
                board[i][0] == board[i][1] &&
                board[i][0] == board[i][2] &&
                board[i][0] == COMPUTER ||
                board[0][i] == board[1][i] &&
                board[0][i] == board[2][i] &&
                board[0][i] == COMPUTER
            ) {
                return true
            }
        }

        return false
    }

    fun hasPlayerWon(): Boolean {

        if (board[0][0] == board[1][1] &&
            board[0][0] == board[2][2] &&
            board[0][0] == PLAYER ||
            board[0][2] == board[1][1] &&
            board[0][2] == board[2][0] &&
            board[0][2] == PLAYER
        ) {
            return true
        }

        for (i in board.indices) {
            if (
                board[i][0] == board[i][1] &&
                board[i][0] == board[i][2] &&
                board[i][0] == PLAYER ||
                board[0][i] == board[1][i] &&
                board[0][i] == board[2][i] &&
                board[0][i] == PLAYER
            ) {
                return true
            }
        }

        return false
    }


    //in this var we will store the computersMove
    var computersMove: Cell? = null

    //this is our minimax function to calculate
    //the best move for the computer
    fun minimax(depth: Int, player: String): Int {
        if (hasComputerWon()) return +1
        if (hasPlayerWon()) return -1

        if (availableCells.isEmpty()) return 0

        var min = Integer.MAX_VALUE
        var max = Integer.MIN_VALUE

        for (i in availableCells.indices) {
            val cell = availableCells[i]
            if (player == COMPUTER) {
                placeMove(cell, COMPUTER)
                val currentScore = minimax(depth + 1, PLAYER)
                max = Math.max(currentScore, max)

                if (currentScore >= 0) {
                    if (depth == 0) computersMove = cell
                }

                if (currentScore == 1) {
                    board[cell.i][cell.j] = ""
                    break
                }

                if (i == availableCells.size - 1 && max < 0) {
                    if (depth == 0) computersMove = cell
                }

            } else if (player == PLAYER) {
                placeMove(cell, PLAYER)
                val currentScore = minimax(depth + 1, COMPUTER)
                min = Math.min(currentScore, min)

                if (min == -1) {
                    board[cell.i][cell.j] = ""
                    break
                }
            }
            board[cell.i][cell.j] = ""
        }

        return if (player == COMPUTER) max else min
    }

    //this function is placing a move in the given cell
    fun placeMove(cell: Cell, player: String) {
        board[cell.i][cell.j] = player
    }

}- The class above is also having our minimax algorithm that will calculate the best move for the computer.
Making Moves
- Now come inside MainActivity.kt and modify it as below.
package net.simplifiedcoding.tictactoe

import android.os.Bundle
import android.view.View
import android.widget.GridLayout
import android.widget.ImageView
import androidx.appcompat.app.AppCompatActivity
import androidx.core.content.ContextCompat
import kotlinx.android.synthetic.main.activity_main.*

class MainActivity : AppCompatActivity() {


    private val boardCells = Array(3) { arrayOfNulls<ImageView>(3) }

    //creating the board instance
    var board = Board()

    override fun onCreate(savedInstanceState: Bundle?) {
        super.onCreate(savedInstanceState)
        setContentView(R.layout.activity_main)

        loadBoard()

        //restart functionality
        button_restart.setOnClickListener {
            //creating a new board instance
            //it will empty every cell
            board = Board()

            //setting the result to empty
            text_view_result.text = ""

            //this function will map the internal board
            //to the visual board
            mapBoardToUi()
        }
    }

    //function is mapping
    //the internal board to the ImageView array board
    private fun mapBoardToUi() {
        for (i in board.board.indices) {
            for (j in board.board.indices) {
                when (board.board[i][j]) {
                    Board.PLAYER -> {
                        boardCells[i][j]?.setImageResource(R.drawable.circle)
                        boardCells[i][j]?.isEnabled = false
                    }
                    Board.COMPUTER -> {
                        boardCells[i][j]?.setImageResource(R.drawable.cross)
                        boardCells[i][j]?.isEnabled = false
                    }
                    else -> {
                        boardCells[i][j]?.setImageResource(0)
                        boardCells[i][j]?.isEnabled = true
                    }
                }
            }
        }
    }


    private fun loadBoard() {
        for (i in boardCells.indices) {
            for (j in boardCells.indices) {
                boardCells[i][j] = ImageView(this)
                boardCells[i][j]?.layoutParams = GridLayout.LayoutParams().apply {
                    rowSpec = GridLayout.spec(i)
                    columnSpec = GridLayout.spec(j)
                    width = 250
                    height = 230
                    bottomMargin = 5
                    topMargin = 5
                    leftMargin = 5
                    rightMargin = 5
                }
                boardCells[i][j]?.setBackgroundColor(ContextCompat.getColor(this, R.color.colorPrimary))
                boardCells[i][j]?.setOnClickListener(CellClickListener(i, j))
                layout_board.addView(boardCells[i][j])
            }
        }
    }

    inner class CellClickListener(
        private val i: Int,
        private val j: Int
    ) : View.OnClickListener {

        override fun onClick(p0: View?) {

            //checking if the game is not over
            if (!board.isGameOver) {

                //creating a new cell with the clicked index
                val cell = Cell(i, j)

                //placing the move for player
                board.placeMove(cell, Board.PLAYER)

                //calling minimax to calculate the computers move
                board.minimax(0, Board.COMPUTER)

                //performing the move for computer
                board.computersMove?.let {
                    board.placeMove(it, Board.COMPUTER)
                }

                //mapping the internal board to visual board
                mapBoardToUi()
            }

            //Displaying the results
            //according to the game status
            when {
                board.hasComputerWon() -> text_view_result.text = "Computer Won"
                board.hasPlayerWon() -> text_view_result.text = "Player Won"
                board.isGameOver -> text_view_result.text = "Game Tied"
            }
        }
    }
}- Now run your application and try beating the Tic Tac Toe.
Tic Tac Toe Android App Tutorial – Source Code
- In case you are having problem following the instructions, you can get your hands into my source code as well. But to get this you need to SHARE this post.
Tic Tac Toe Android App Tutorial Source Code
So that’s all for this Tic Tac Toe Android Studio tutorial. If you have any questions regarding this tutorial then let me know in the comment section below.